Guide confidence: Zone ratings and spot labels reflect community playtests on v1.8.1. Confidence tags (Verified, Community Favorite, Needs Retest) are editorial — retest after major patches.
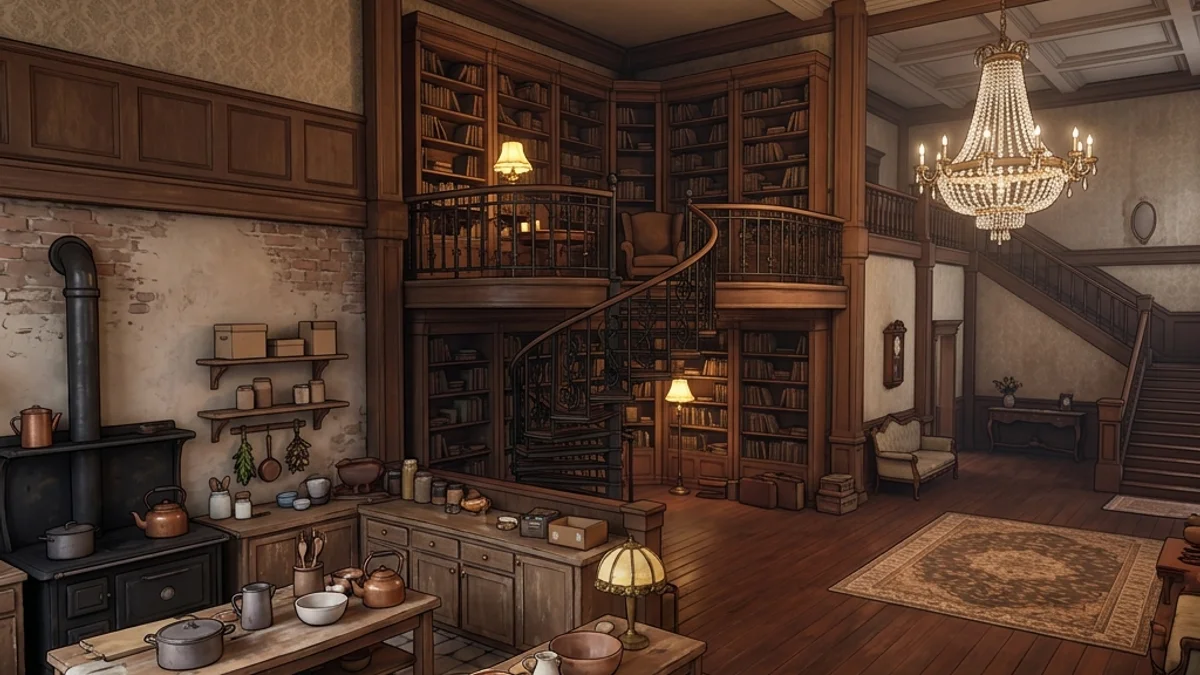
The official Mansion stage (often referred to by the community as hide-and-seek-mansion) is the classic launch map for Meccha Chameleon. Set in a Victorian manor, this map features three main zones: a cluttered Kitchen, a multi-tiered Library, and a spacious Main Hall with high ceilings. The abundant wood grain, wallpaper designs, and furniture clutter make it the benchmark map for camouflage matching.
This guide provides a detailed zone breakdown, confirmed hiding locations, sweep paths for seekers, and map tactics.
1. Map Overview: Hider vs. Seeker Balance
Mansion is highly balanced for both roles:
- Hider Advantages: Huge amounts of furniture, varying shadow depths, and wood textures that make it easy to hide using matte, brown-toned paint.
- Seeker Advantages: Linear paths that prevent hiders from easily rotating around rooms, and high balconies that allow seekers to scan entire rooms from above.
2. Zone Breakdown & Tactical Ratings
Below is a breakdown of the key areas of the Mansion map:
| Zone Name | Hider Safety | Seeker Sweep Priority | Key Features |
|---|---|---|---|
| The Library (Loft & Ground) | High | Medium | Bookcases, leather armchairs, shadows. |
| The Kitchen & Pantry | Medium | High | Kitchen counters, shelves, pans, plates. |
| Main Hall (Ground Floor) | Low | High | Fireplace, piano, center rugs, wide open. |
| Upper Corridor Balcony | Medium | Low | Columns, painting frames, dark wallpaper. |
Competitive meta: Mansion rounds are decided in the first 90 seconds — seekers who tag Main Hall panickers snowball time for Library sweeps; hiders who over-commit to piano shadows lose when chandelier flicker breaks paint samples. In ranked customs, hosts often ban whistle until Phase 2 completes to keep kitchen pantry tiers viable.
3. Confirmed Hiding Spots
Here are five verified spots you can utilize in your next match:
Spot 1: The Library Bookcase Gaps
- Location: Between the second-tier bookshelves on the upper walkway.
- Stance: Select Corner-Squeeze or Wall-Flat.
- Confidence: Verified (Matches vertical book lines perfectly if painted in alternating dark tones).
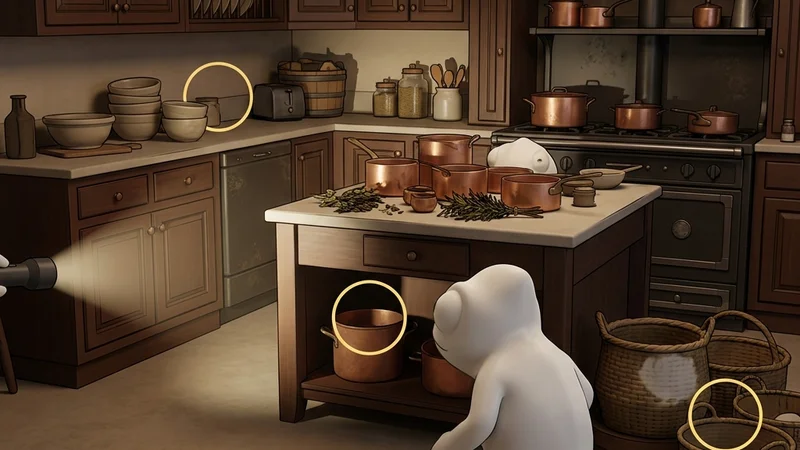
Spot 2: The Kitchen Counter Corner
- Location: Directly behind the stacked dinner plates on the main counter.
- Stance: Select Curl.
- Confidence: Community Favorite (Seekers running past will feel collision, but visually it looks like an extra container).
Spot 3: Grand Piano Pedals
- Location: Under the grand piano in the Main Hall, aligned with the foot pedals.
- Stance: Select Crouch-Lean.
- Confidence: Needs Retest (Relies on the piano’s shadow masking your model; vulnerable to direct flashlight zoom).
Spot 4: Corridor Columns
- Location: Pressed against the decorative wood pillars lining the upper balcony.
- Stance: Select Wall-Flat (align your spine with the pillar seam).
- Confidence: Verified ( mahogany texture matching makes you look like a flat architectural extension).
Spot 5: Pantry Shelf Niche
- Location: The narrow gap between the pantry shelving unit and the kitchen wall, behind stacked dry-goods boxes.
- Stance: Select Corner-Squeeze.
- Confidence: Verified (The v1.2.0 collision fix closed the old clip exploit here — the niche is now a legitimate, high-safety pocket if you match brown cardboard tones).
4. Paint Difficulty: Solid vs. Pattern
- The Wood Panels (Easy): Hiding against the mahogany panels is highly forgiving. Set roughness to
0.8, metallic to0.0, and sample the mid-tones. - The Striped Wallpaper (Hard): The green and gold striped wallpaper in the corridors is difficult to match. If you sample only the green stripe, the gold stripes crossing your body will break your outline. Hiders must manually paint alternate brush strokes or find spots where dynamic shadow hides the pattern.
5. Seeker Sweep Route (4 Phases)
To clear the Mansion systematically within the time limit, seekers should follow this route:
[Phase 1: Main Hall] ──> [Phase 2: Kitchen] ──> [Phase 3: Library Ground] ──> [Phase 4: Library Balcony & Corridors]- Phase 1 (Main Hall): Clear the open space first. Check the fireplace and behind the grand piano immediately. Any hiders who panicked during the prep phase are caught here.
- Phase 2 (Kitchen): Walk along the counters. Run your model against the pans and plates to check for physical collision.
- Phase 3 (Library Ground): Sweep under the study desks. Shine your flashlight at the legs to check for double shadows.
- Phase 4 (Library Balcony & Corridors): Head upstairs. Scan the wood columns at eye level while walking back toward the foyer.
6. Patch Notes Impact
-
v1.2.0 Collision Fix: Patched a gap behind the kitchen pantry where players could clip out of bounds (see the v1.2.0 update notes).
-
v1.8.0 Texture Pass: Mahogany wood grain textures were sharpened, making it slightly harder for low-roughness hiders to match without adjusting paint details.
-
v1.8.1 Stability: No Mansion-specific collision changes in v1.8.1; texture pass from v1.8.0 still applies — retest low-roughness wood matches after driver updates.
7. Recommended Lobby Settings
Mansion rewards 4–8 players with one or two seekers. Larger lobbies still work, but the Main Hall becomes too easy to sweep once seekers split zones.
| Total players | Seekers | Whistle timer | Host notes |
|---|---|---|---|
| 4 | 1 | 45s | Best for teaching painting basics; library loft carries hiders. |
| 6 | 2 | 50s | Standard pub match — assign one seeker to kitchen, one to hall. |
| 8 | 2–3 | 55s | Enable whistle only after Phase 2; seekers should finish Main Hall before splitting upstairs. |
Difficulty tip: If hiders win three rounds in a row, drop whistle timer by 5 seconds or add a third seeker at 8 players — Mansion’s furniture density favors camouflage more than movement.
8. Tools & Prep for This Map
Before queueing Mansion in a custom lobby, line up your loadout with these site tools:
- Seeker Checklist — tick off the four Mansion phases (Hall → Kitchen → Library ground → Balcony) so you never backtrack into a cleared zone.
- Route Planner — select Mansion, your role, and risk level; it outputs a three-step opening plan (e.g., hiders: Library loft first; seekers: piano sweep first).
- Map Compare — contrast Mansion vs. Horror Mansion before subscribing — lighting and hider safety differ despite similar assets.
- Hider Tips and Seeker Tips — role fundamentals that apply on every official stage, including whistle timing and flashlight zoom checks.
First-match checklist (Mansion)
- Prep (hider): Sample mahogany from a statically lit library corner — not under the chandelier — then walk to your tier before whistle.
- Prep (seeker): Memorize Phase 1 piano + fireplace collision checks; most round-one tags happen here.
- Mid-round: Hiders rotate Library → Pantry only after whistle; seekers finish Kitchen before upstairs split.
- Late-round: Re-run Phase 4 balcony columns if whistle fired twice — corner-squeeze hiders rarely move after second whistle.
Opening move (30 seconds): Hiders path Library loft via kitchen side door to avoid Main Hall exposure; seekers sprint piano collision before splitting to pantry.
9. Related Workshop Content
If you enjoy the aesthetic of Mansion, check out the community-built Workshop map Horror Mansion, which features identical assets but uses a night-time lighting setup. Read our guide for Horror Mansion to prepare.